Majestic Calla Lily: Tips for Planting and Handling
Calla lily or Arum lily is a perennial plant of the Zantedeschia genus, Araceae family. It can be seen in nature in the humid districts of South America and in Africa – from Nigeria to Tanzania. The close relative of calla lily is water arum, the only plant of this genus that naturally grows in the Northern hemisphere.

The genus Zantedeschia has got its name because of a german botanist Kurt Sprengel. He gave these plants the name of his good friend, an italian plant scientist Giovanni Zantedeschi.
However, mostly they popularly called calla lilies.
- Characteristics of calla lilies
- Species and varieties
- Growing calla lily outdoors
- Outdoor callas: planting and handling
- Indoor calla lily
- Calla lily after blooming
- Storing calla rhizomes over winter
Characteristics of Calla Lilies
Growing callas requires adhering to certain agrotechnical rules. They can be grown indoors as typical house plants in pots, or you can grow calla lilies outdoors, in your garden.
However, there are facts about calla lily that you need to know when going to handle any variety of a calla:
- Callas can't be planted deep into the ground, you rather need to cover rhizomes with soil. Otherwise roots may start rotting.
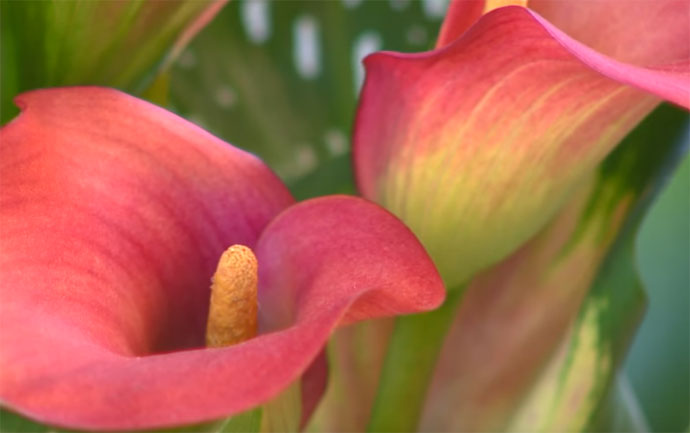
- What beginners think to the flower of calla is actually a bract surrounding the spadix. Real flowers of calla cover the spadix, they are pretty little, tiny but very aromatic.
- After planting, calla lily doesn't sprout before the root system is formed completely. You don't need to worry if there are no sprouts popping up during the first month after the planting.
- Be careful when digging up calla rhizomes, they are very fragile.
- Calla lily is a natural barometer. Before it's going to rain you will see drops of water on calla's leaves.
- When selecting a pot for your calla lily, choose a porous one to let the needless water vapour out. It's especially important when it comes to growing Ethiopian species of calla lily.
Also, Ethiopian callas prefer to grow alone, they don't accept any other plants in their pots.
- Every bract of calla lily blooms for about a month.
- From time to time you need to change a top layer of soil, carefully, being cautious not to damage rhizomes.
Species and Varieties of Calla Lily
There are 8 species of calla recognized. But only 3 of them are cultivated, they are used as base material for breeding new varieties of calla lily.
Zantedeschia aethiopica
These species of calla are large (around a meter high), and have a real rootstock, not a bulb like other species of calla have. Zantedeschia aethiopica is a moisture-loving plant. This evergreen callas don't shed their big shiny leaves even during a dormant period.
The most popular varieties of Zantedeschia aethiopica are:
Nicolai: A flower stalk is up to 1,5 m high. Leaves are hastate, dark-green, with long leafstalks.
Green Goddess: Incredibly beautiful flower plant with a white-green bract, up to 90 cm high.
Schone Zweibruckerin: This plant has heart-shaped light green leaves. A flower stalk is up to 1 m high, the diameter of a bract is 10 to 15 cm.
Zantedeschia rehmannii
Short species of calla lily (up to 70 cm high), with a pink, purple or crimson bract and narrow green leaves. Roots are very similar to begonia's bulbs. Calla rehmannii sheds leaves and needs to rest during the dormant period.
There are a few popular varieties of Zantedeschia rehmannii:
Chameleon: This short variety of calla can be easily grown either in a pot or in the garden. It has a peach-coloured bract with golden iridescent.
Indian Summer: Red or puniceous callas.
Black Forest: Glossy, dark purple, almost black callas
Zantedeschia elliottiana
These species of calla lily have large, mottled, green, heart-shaped leaves. Bract's skin is yellow on top and yellow-green on the bottom. Flower stalks are about 50 cm high.
The most interesting varieties of this calla are:
Acapulco Gold: This calla has sunny-yellow bracts and green leaves with white dots.
Vermeer: Bract of this calla has marble-white bottom skin and purple top skin, leaves are dark-green with white dots.
Black Eyed Beauty: This variety has a creamy-white with a light yellow touch bract and dotty leaves.
The other 5 species of calla lily are Calla albomaculata, Calla odorata, Calla valida, Calla pentlandii and Calla jucunda.
Growing Calla Lily Outdoors
When blooming, calla lilies make any garden so gorgeous! Flowerbeds filled with callas remind of arabic ornamental art: between many green leaves you can see here and there elegant arrows of flower stalks. Rhizomes make new offshoots every year.
Calla lily loves open, roomy flowerbeds and rich soil. Although, for hot sunny days you'll need to provide the plants with shade. When growing in direct sun, callas wither, get burnt or dry. So it's a good idea to plant your callas near some trees or bushes that will create shade in the afternoon.
Calla lilies need acid or slightly acid soil and good drainage. Overwatering is dangerous for callas' roots. The ideal soil mix for them is made of ground, sand and peat in equal proportions.
Outdoor Callas: Planting and Handling
Planting during Spring
You can plant your callas when sure that night frosts are over. Let's say, around May for the temperature zone 5, and earlier for the zone 8 or higher.
Before you start planting, put calla's rhizomes in a disinfectant solution for 30 min. Then check the bulbs and cut off bad spots if needed, and cure the cuts with a disinfectant.
You also need to prepare a bed for your callas. Nourish with a mineral fertilizer (30 to 40 g per 1m²) and turn over the soil.
Now you can plant the rhizomes. Make holes 5 to 10 cm deep, 30 to 40 cm apart (depending on the size of a bulb) and plant the bulbs into the holes.
Once planted, moisten the flower bed very well.
As we mentioned earlier, callas don't sprout before their root system is completely formed. So, first sprouts you can see after two week as earliest or even after a month.
Be patient and don't disturb your calla lily with checking up the rhizomes. Don't water them for 2 weeks after planting.
There is a special way to prepare a calla lily for planting. In the beginning of Spring, plant calla's bulbs into small pots, 2 to 3 cm deep. Use the special soil for seedings, or soil that's been heat-treated in the oven for 40 min.
Water the bulbs 1 to 2 times per week. A week before planting, every day put the pot next to an open window to harden off your future calla lily.
When transplanting callas into garden beds, move them together with their balls of soil.
Planting during Autumn
Unfortunately, it is impossible to plant calla lilies during Autumn.
Handling of Calla Lily Outdoors
Caring for a calla lily is very easy. All you need to do for its successful growing is moistening and loosening the soil.
Water your plant moderately but regularly. When the Summer is very hot, give it more water and other way around. After watering always loosen the soil around your calla.
If you fertilized the ground before planting, your calla lily won't need any extra nutrition.
If you think that the soil isn't sour enough, apply there some water mixed with citric acid or vinegar.
Indoor Calla Lily
Sprouting indoor calla
When growing indoors, calla lilies require the room temperature around 22 to 25 °C during the Summer and 14 °C during the Winter. Calla needs a lot of light, but be sure it's protected from direct sunlight and drafts.
The best soil for an indoor calla lily has a pH 6 to 6,5. Also will be good to add into the growing medium some peat dust or peat with wood dust.
For planting indoors, choose rhizomes around 6 cm in diameter. The diameter of the pot needs to be about 25 cm. Plant a rhizome 5 cm deep and water it with a fungicide solution.
Handling Calla Lilies Indoors
There is nothing really difficult when it comes to handling calla lily indoors. Be careful when watering the rhizome that you just planted. If there is too much water, the root can get rotten even before sprouting.
If you would like your calla start blooming early and have a bright colour of a bract, there is a tip for it. In the night keep the pot with a planted rhizome at the temperature of 16 °C. During the day provide your future calla with a lot of light, but avoid direct sunlight.
If you are sprouting your calla lily in the winter, you need to use luminous tube lamps to assure that your calla has 10 hours of light.
Nourish indoor calla lilies with a balanced liquid fertilizer, mixing it with water when moistening the soil (every 5th watering).
Propagation of Callas
You can propagate calla lily from seeds (unpredictable result and long time to wait), from bulbs and by dividing.
Propagation by dividing is only suitable for Calla Aethiopica. In the Autumn, when digging up your calla lilies for storing over the winter, separate an offshoot together with a part of a tuber and transplant it into a pot of soil. In the spring just plant it into a garden bed as usual.
Other species of calla lily you can propagate from rhizomes. Just dig them up and store over winter. When the spring is back, plant rhizomes into outdoors beds.
Calla Lily After Blooming
There are different rules for taking care of different species of calla lily after blooming.
As you already know, zantedeschia aethiopica has special rhizomes: real rootstock, not a bulb. These species have their dormant period in the middle of the Summer.
For indoor calla aethiopica the procedure will be as per following.
When you notice that in the middle of the Summer your callas first slow down in growing, then stop at all and become yellowish, reduce watering and put your them in a very well lighted place, where they will stay safe from rain drops.
In the first half of July (zone 5) take the calla lily out of its pot, remove all the old leaves and offshoots, and transplant the calla into the new rich soil. Keep it in a well-lighted place and start watering and fertilizing your calla again, preparing it for next blooming.
An outdoor calla aethiopica will stay in its flower bed until the Autumn. In September, dig up the rhizomes and store them together with their balls of soil in a dry, cool room. Once a while water them moderately.
When going on a dormant period, those species of calla lily that have regular bulbs will get their bracts greenish and wilted, leaves will get yellow and dry.
Dig up your outdoor calla lilies in the end of September, be careful not to damage roots. Shake off the soil and wash the bulbs with water. Keep for a couple of weeks at the temperature of 5 to 10 °C, until the roots will receive nutrient materials from foliage. After that, dry leaves can be easily removed.
Storing Calla Rhizomes Over Winter
In temperature zones 5 or less you can not leave calla's rhizomes under the ground over the winter. Dig them up. When the leaves are completely dry, you need to remove them and put the rhizomes for 30 min into a disinfectant solution. Then rinse them with water and put into a dark room to dry.
Once dried, sort them into paper bags and store at the temperature 5 to 7 °C, in the bottom part of the fridge e.g.
If you can't store the roots of your Zantedeschia aethiopica in the cold place, just let them dry a little bit and cut off the leaves. Store in the same way like bulbs of any other species of calla lily.
Recommended articles for you:
Once a while check if the rhizomes are doing good, if they don't root or get too dry.
An indoor calla lily can stay in its pot. You just need to move it into a cool terrace or veranda.
Let your calla lily take a good dormant period, and after it will gladden you with beautiful blooming again. Otherwise it will be washed out and won't start flowering at all.